Website Audit Checklist for 2023 [Template and 15-Step Guide]
Updated for 2021: Follow our 15-step website audit checklist to boost your Google search rankings and get more traffic on your website.
By: Ed Harris · Published: July 26, 2021 · updated: June 28, 2024
In this guide we’re going to share our complete website audit checklist that you can use to boost your Google search rankings and get more traffic on your website.
Website audits can cover many areas, including:
- Website technical performance audit
- Organic search visibility audit (SEO)
- User experience audit
- Website content audit
- Accessibility audit
- Lead conversion audit
Our goal here is to introduce you to all the areas listed above at an introductory level. Once you’ve conducted a basic audit you can return to dig into more detail in these areas.
A word of warning before we get started: there are lots of tools and software platforms out there that offer a “website audit” or “website check” or “website seo audit”, and some of them are even free!
A templatized, one-size-fits-all website audit can be helpful as a starting point, but a real website audit needs to also take into account the specific needs, functionality and structure of the website. And every website (and every business) is different. Take the time to consider what’s important to your website (and to your business), and if you decide to work with an SEO consultant or order a professional website audit service, make sure they ask you questions about your business objectives and current pain points before they get started.
Download your FREE Interactive Website Audit Checklist
Get your copy of our interactive Google Sheet Website Audit Checklist template!
(Also available as a printable PDF).
Unsubscribe at any time. Privacy Policy and Terms of Use apply.
Website Audit Checklist Steps
- Step 1: Get some baseline data with Google Analytics
- Step 2: Make sure Google is only indexing one version of your website
- Step 3: Check that your website is mobile friendly
- Step 4: Improve your website’s speed
- Step 5: Remove low-quality and unnecessary pages from Google’s index
- Step 6: Fix indexing problems using Google Search Console
- Step 7: Fix broken links and stop 404 errors
- Step 8: Analyze backlinks (and disavow toxic links if necessary)
- Step 9: Check your website against user accessibility guidelines
- Step 10: Improve on-page SEO for your most important content
- Step 11: Make sure your content gives users what they are looking for
- Step 12: Organize your website navigation
- Step 13: Peek at your competitors’ websites and identify content gaps
- Step 14: Set up recurring website health monitoring and alerts
- Step 15: Set up keyword position tracking and alerts
- Explore our Website Audit Services
This checklist is organized to help you be efficient, so as much as you can, try and follow the steps in order!
- Step 1 is focused on some basic tool setup and getting some baseline data about traffic on your website and your current visibility in organic Google search results.
- Steps 2–9 are focused on technical performance, clean-up, and optimization of the website as a whole.
- Steps 10–12 are about improving your existing website content and on-page SEO.
- Step 13 touches on what new content you might want to create on your website.
- And finally, steps 14–15 will get you set up to monitor your website over time and make sure you are alerted automatically of any significant changes that need your attention.
Before we get into the audit steps, attention nonprofit marketers! Here at Blue Hills Digital, our work focuses on helping nonprofit organizations get the most out of their websites. If you’re considering auditing a nonprofit website, check out the additional resource below.
Nonprofit Website Audit Workbook
Feeling uncertain about your website’s performance? Worried you’re missing opportunities to improve?
Start building your website roadmap with our DIY, 15-step interactive workbook today.
Disclosure: some of the links below are affiliate links, meaning that at no cost to you, we will earn a commission if you click through and make a purchase. Learn more about the products and services we recommend here.
Step 1: Get some baseline data with Google Analytics
Our first step is to understand how your website is performing right now. This will give us some baseline information that you can come back and review again later to check on how things have improved.
If you already have Google Analytics set up, great! If not, check out the official Google Analytics documentation.
First, let’s check on your organic search traffic.
In the GA4 dashboard navigate to Reports > Acquisition > Traffic Acquisition section, and set a date range if you want. Then click on the “Organic Traffic” label below the traffic line chart to highlight the traffic from organic search.
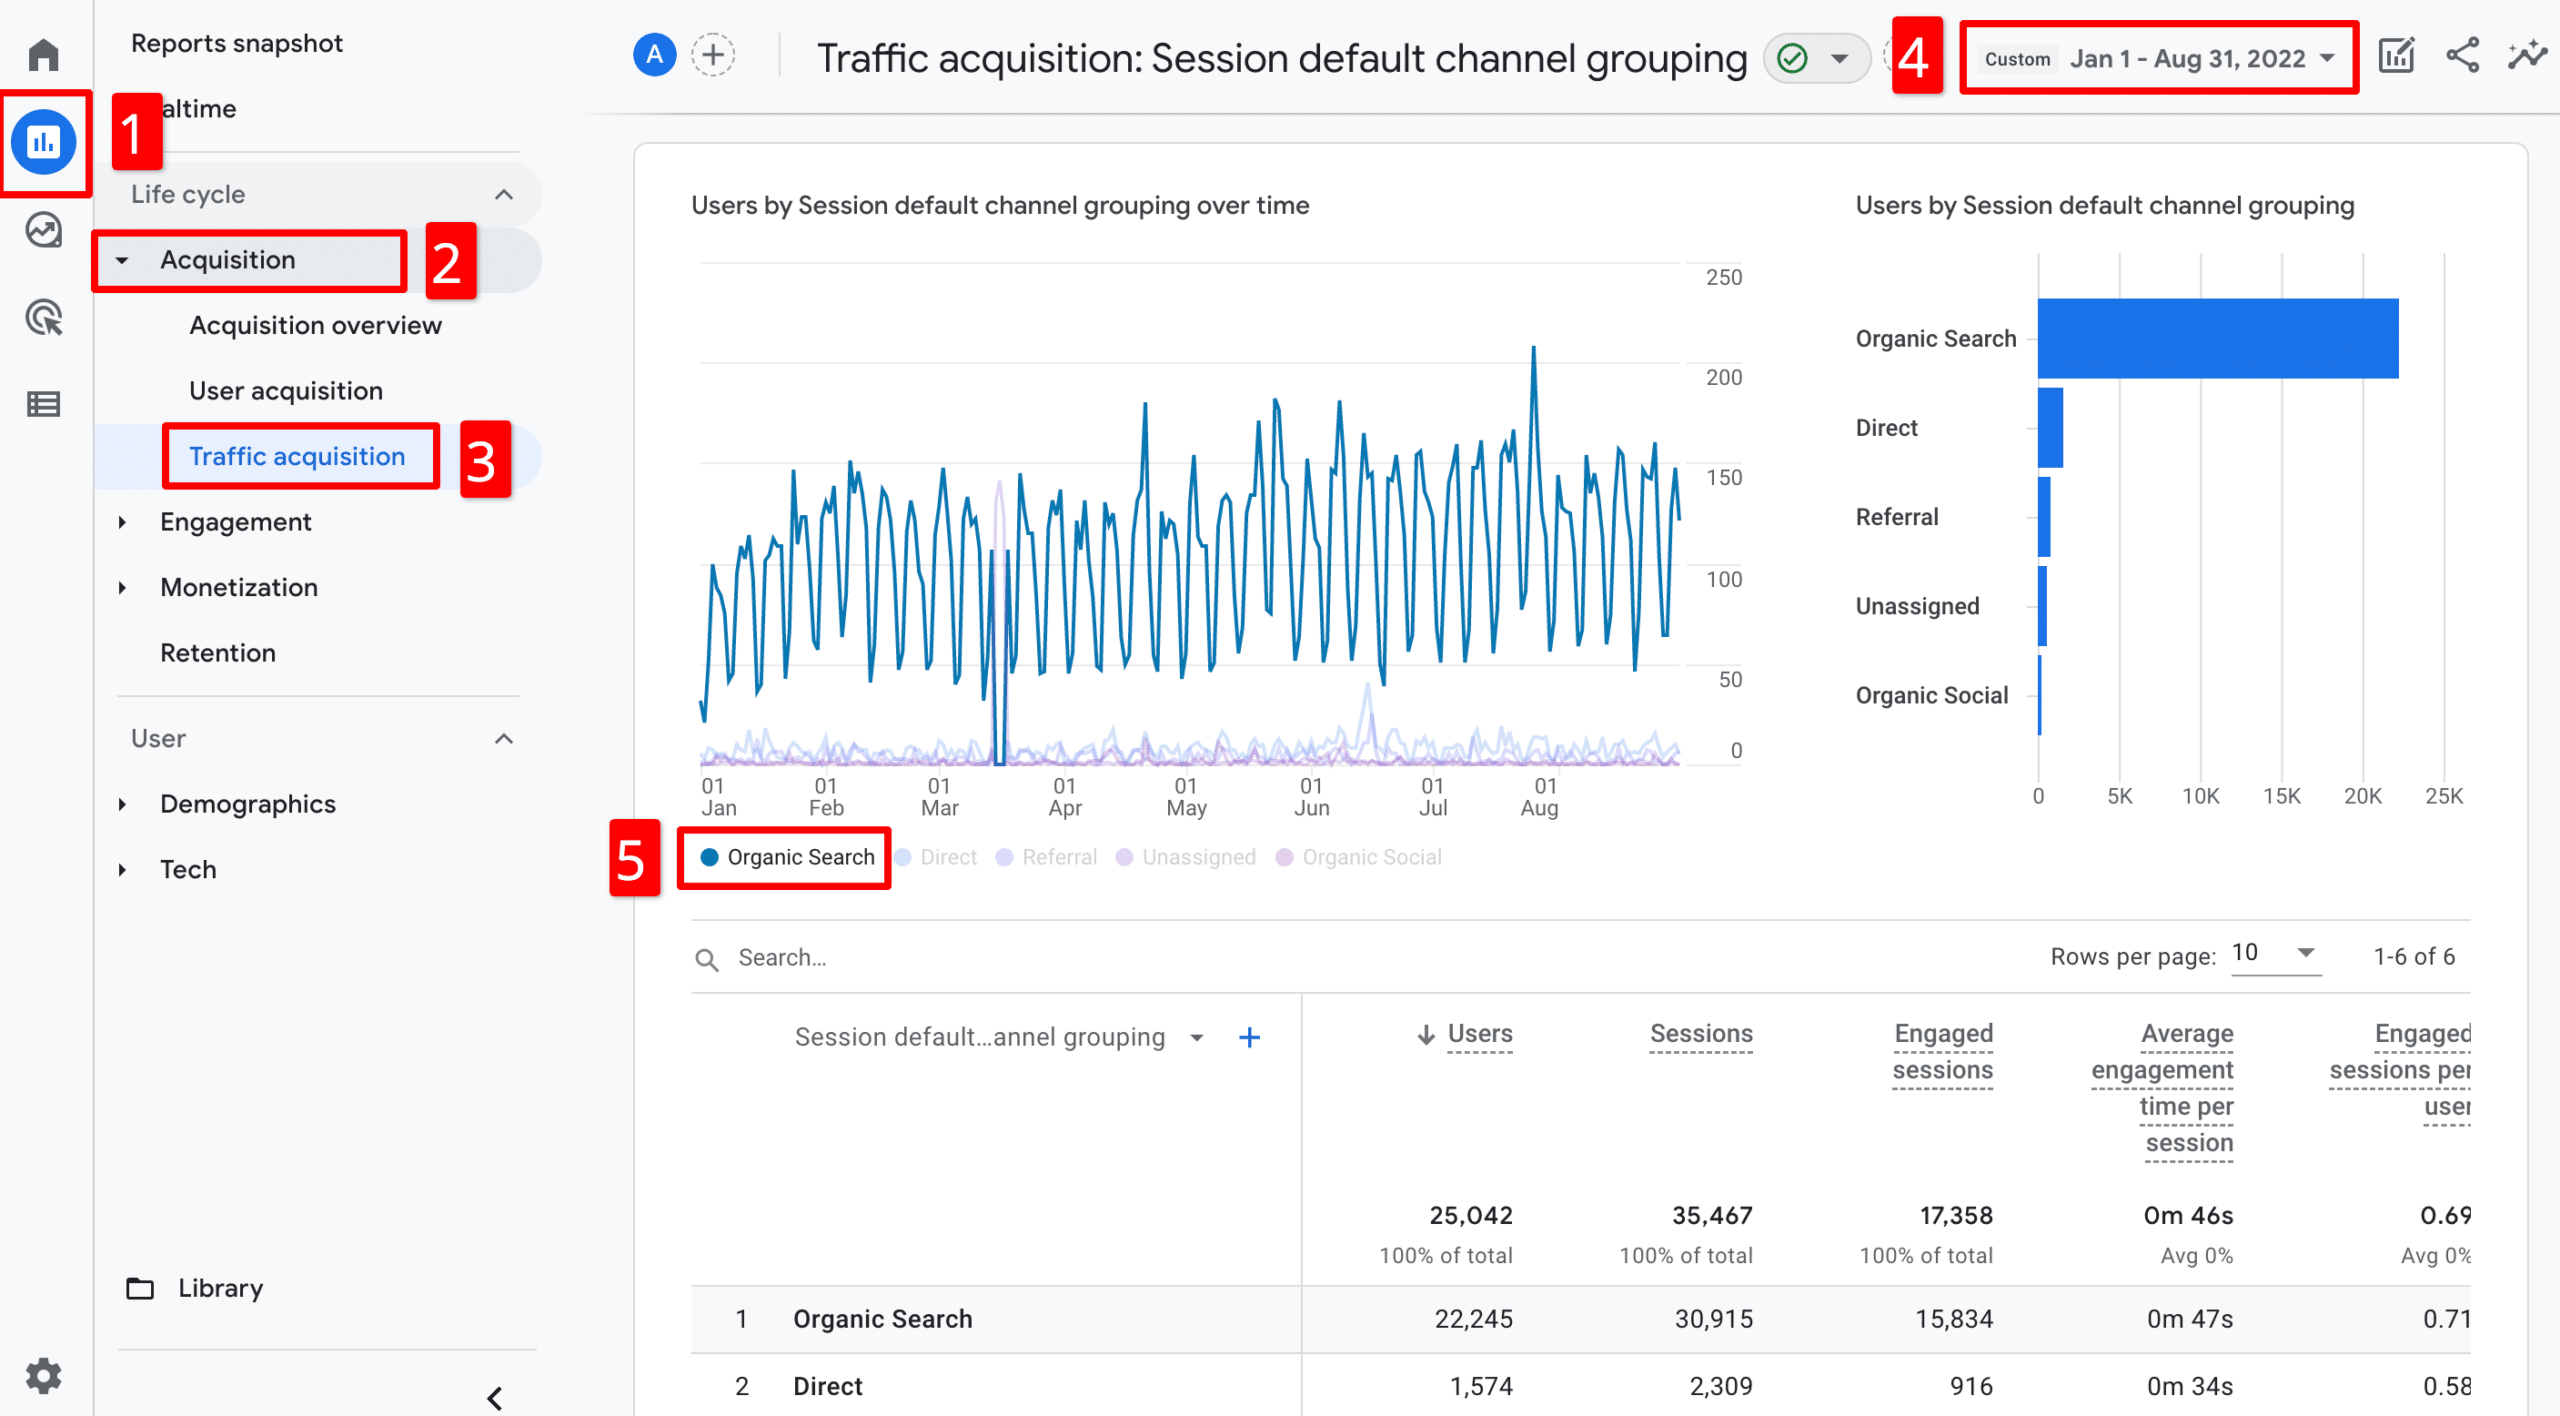
In this example, you’ll see a slow upward trend in organic search traffic, which is just fine.
It’s important to explore your website’s Google Analytics reports and understand what your current, typical traffic mix looks like. You might want to explore:
- Are there normal seasonal trends in traffic?
- Are some traffic channels growing or declining? If so, can we identify changes in our marketing behavior that could have caused those changes?
- Which pages are the most popular on the website? (Check out the Behavior > Site Content reports for these insights).
Step 2: Make sure Google is only indexing one version of your website
Many website owners don’t realize that it’s possible for search engines to index four different versions of your site. That’s because from a Google crawler’s perspective, these are all different URLs:
- http://example.com
- http://www.example.com
- https://example.com
- https://www.example.com
That’s definitely not a good thing: you need to have your website settings and redirect rules set up to ensure that all four of versions resolve to a single version.
You should definitely be forcing all users to load your webpages over the secure https protocol (which requires a valid and properly installed SSL certificate to avoid browser warnings).
Whether or not you choose to prioritize the www or non-www version matters less. What matters, however, is consistency. Pick one version to use, and make sure all your internal links reflect that. And if you decide to use the www prefix, make sure the non-www URLs all redirect to the www URLs (or the other way around).
To test your current configuration, replace “example.com” in the list above with your root domain, and try typing each of the four variations into your browser. If your configuration is correct, they should all resolve to the same version.
For example, when you type “http://bluehillsdigital.com” into a browser, the URL resolves both to the version served over secure https and with the www prefix.

Step 3: Check that your website is mobile friendly
Making sure your website is easy to use on mobile devices is more important than ever, for two reasons:
- The proportion of users searching or browsing the internet on mobile devices has been hovering around 50% (and climbing) since 2017.
- Google moved to mobile-first indexing in 2018, prioritizing the mobile experience of a webpage over the desktop experience.
For several years, Google offered a free tool specifically designed to test URLs for mobile friendliness, along with mobile page experience reports in Google Search Console. In December 2023, Google retired the mobile-friendliness test, and now recommends you use the Lighthouse site auditing tool to test multiple aspects of your website’s performance, including mobile usability, performance, accessibility, and SEO.
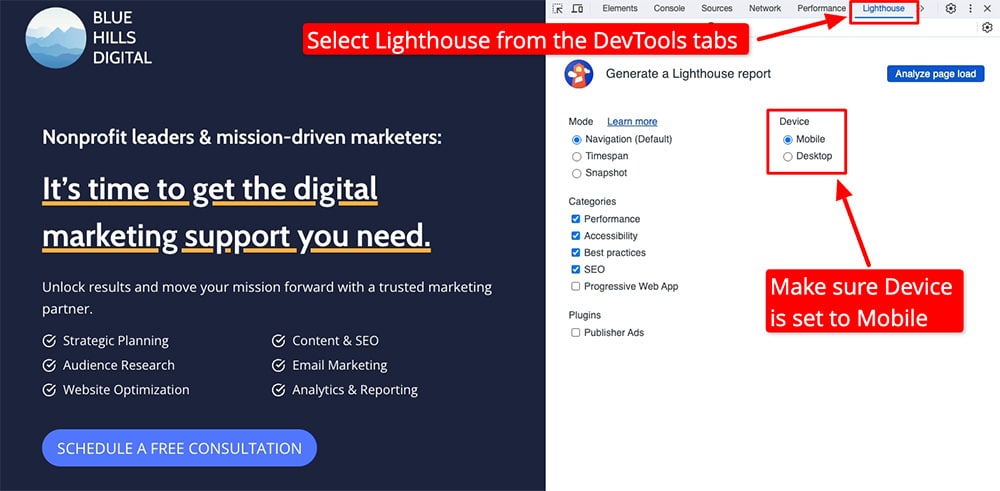
The Lighthouse testing tool is built into the Chrome browser. To use Lighthouse, open an Incognito (private) browsing window and load the URL you want to test. Then open the Chrome Developer Tools panel (View > Developer > Developer Tools in the Chrome application menu). In the DevTools window, open the Lighthouse panel, and make sure Mobile is selected under the Device settings. Then click the Analyze Page Load button. You will see the audit run, based on the mobile device page experience. If there are any mobile usability issues, you will see details in the report along with recommendations about how to address these issues.
Step 4: Improve your website’s speed
Similar to the testing for mobile usability, website page load times are another area to monitor and work to improve. A website with pages that load quickly offer a better user experience, and page speed is one of the “ranking factors” considered by Google.
The 2021 Core Web Vitals update expands this focus on the user’s experience of how a webpage loads. The Core Web Vitals update also prioritizes the visual stability of webpages as they load and the time it takes for elements on a webpage to become interactive.
Luckily there are a couple of free, simple tools you can use to test your website speed and performance against these criteria.
First, run your website URL through Google’s PageSpeed Insights tool:
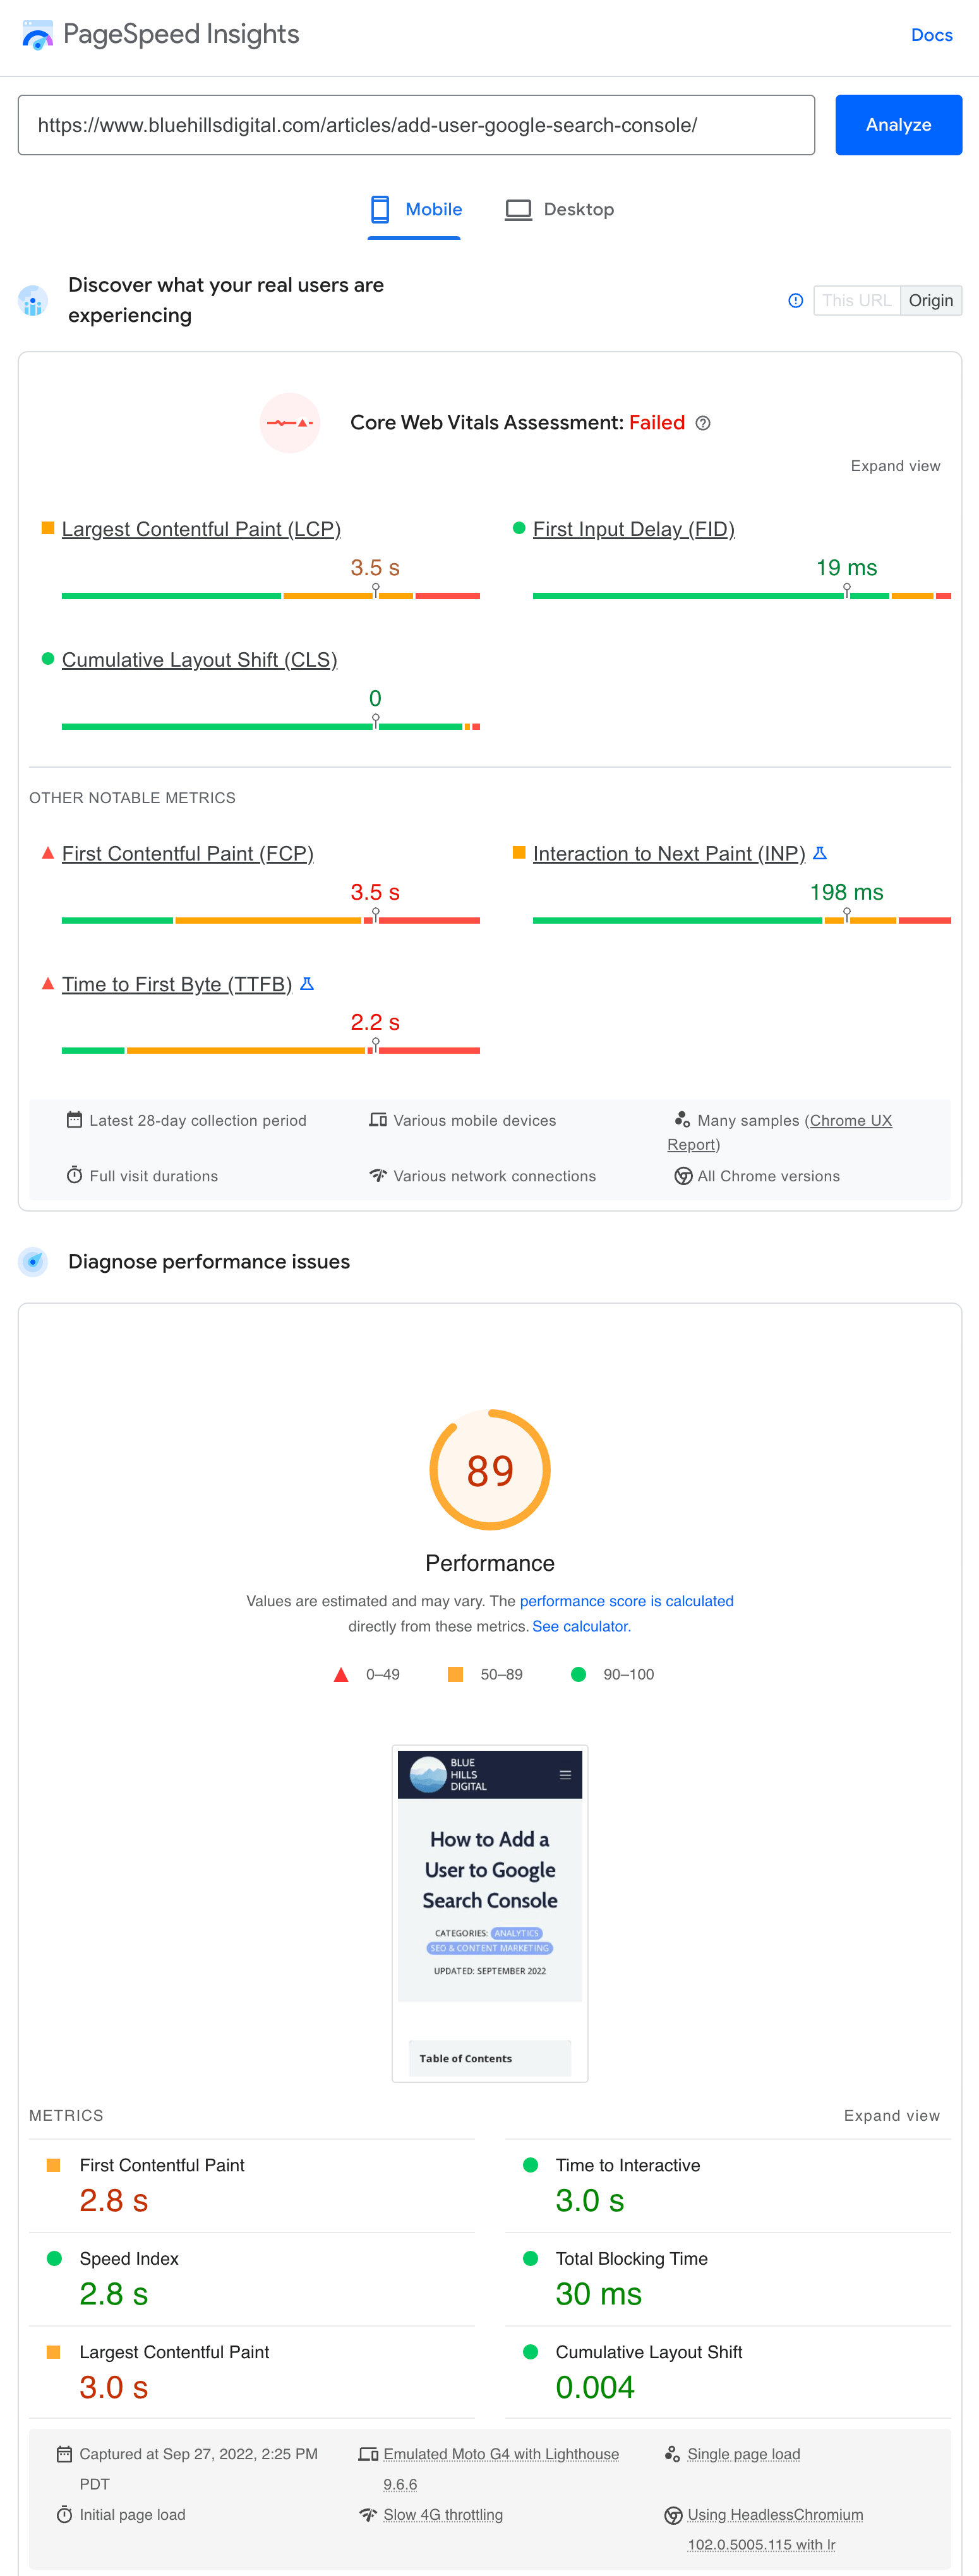
PageSpeed Insights provides reports on mobile and desktop performance, and uses both lab and field data. Lab data is collected in a controlled environment and will be available for all websites. Additionally if your website has sufficient traffic, field data may also be available from real user sessions.
Additionally you may want to explore other speed and performance testing tools:
Don’t be surprised if you get different results from all of these tools. You’ll even get different results for the same URL from the same tool from test to test, since each time the test is performed conditions will be different (as they are for real-world users).
Here’s an example of URL report from GT Metrix:
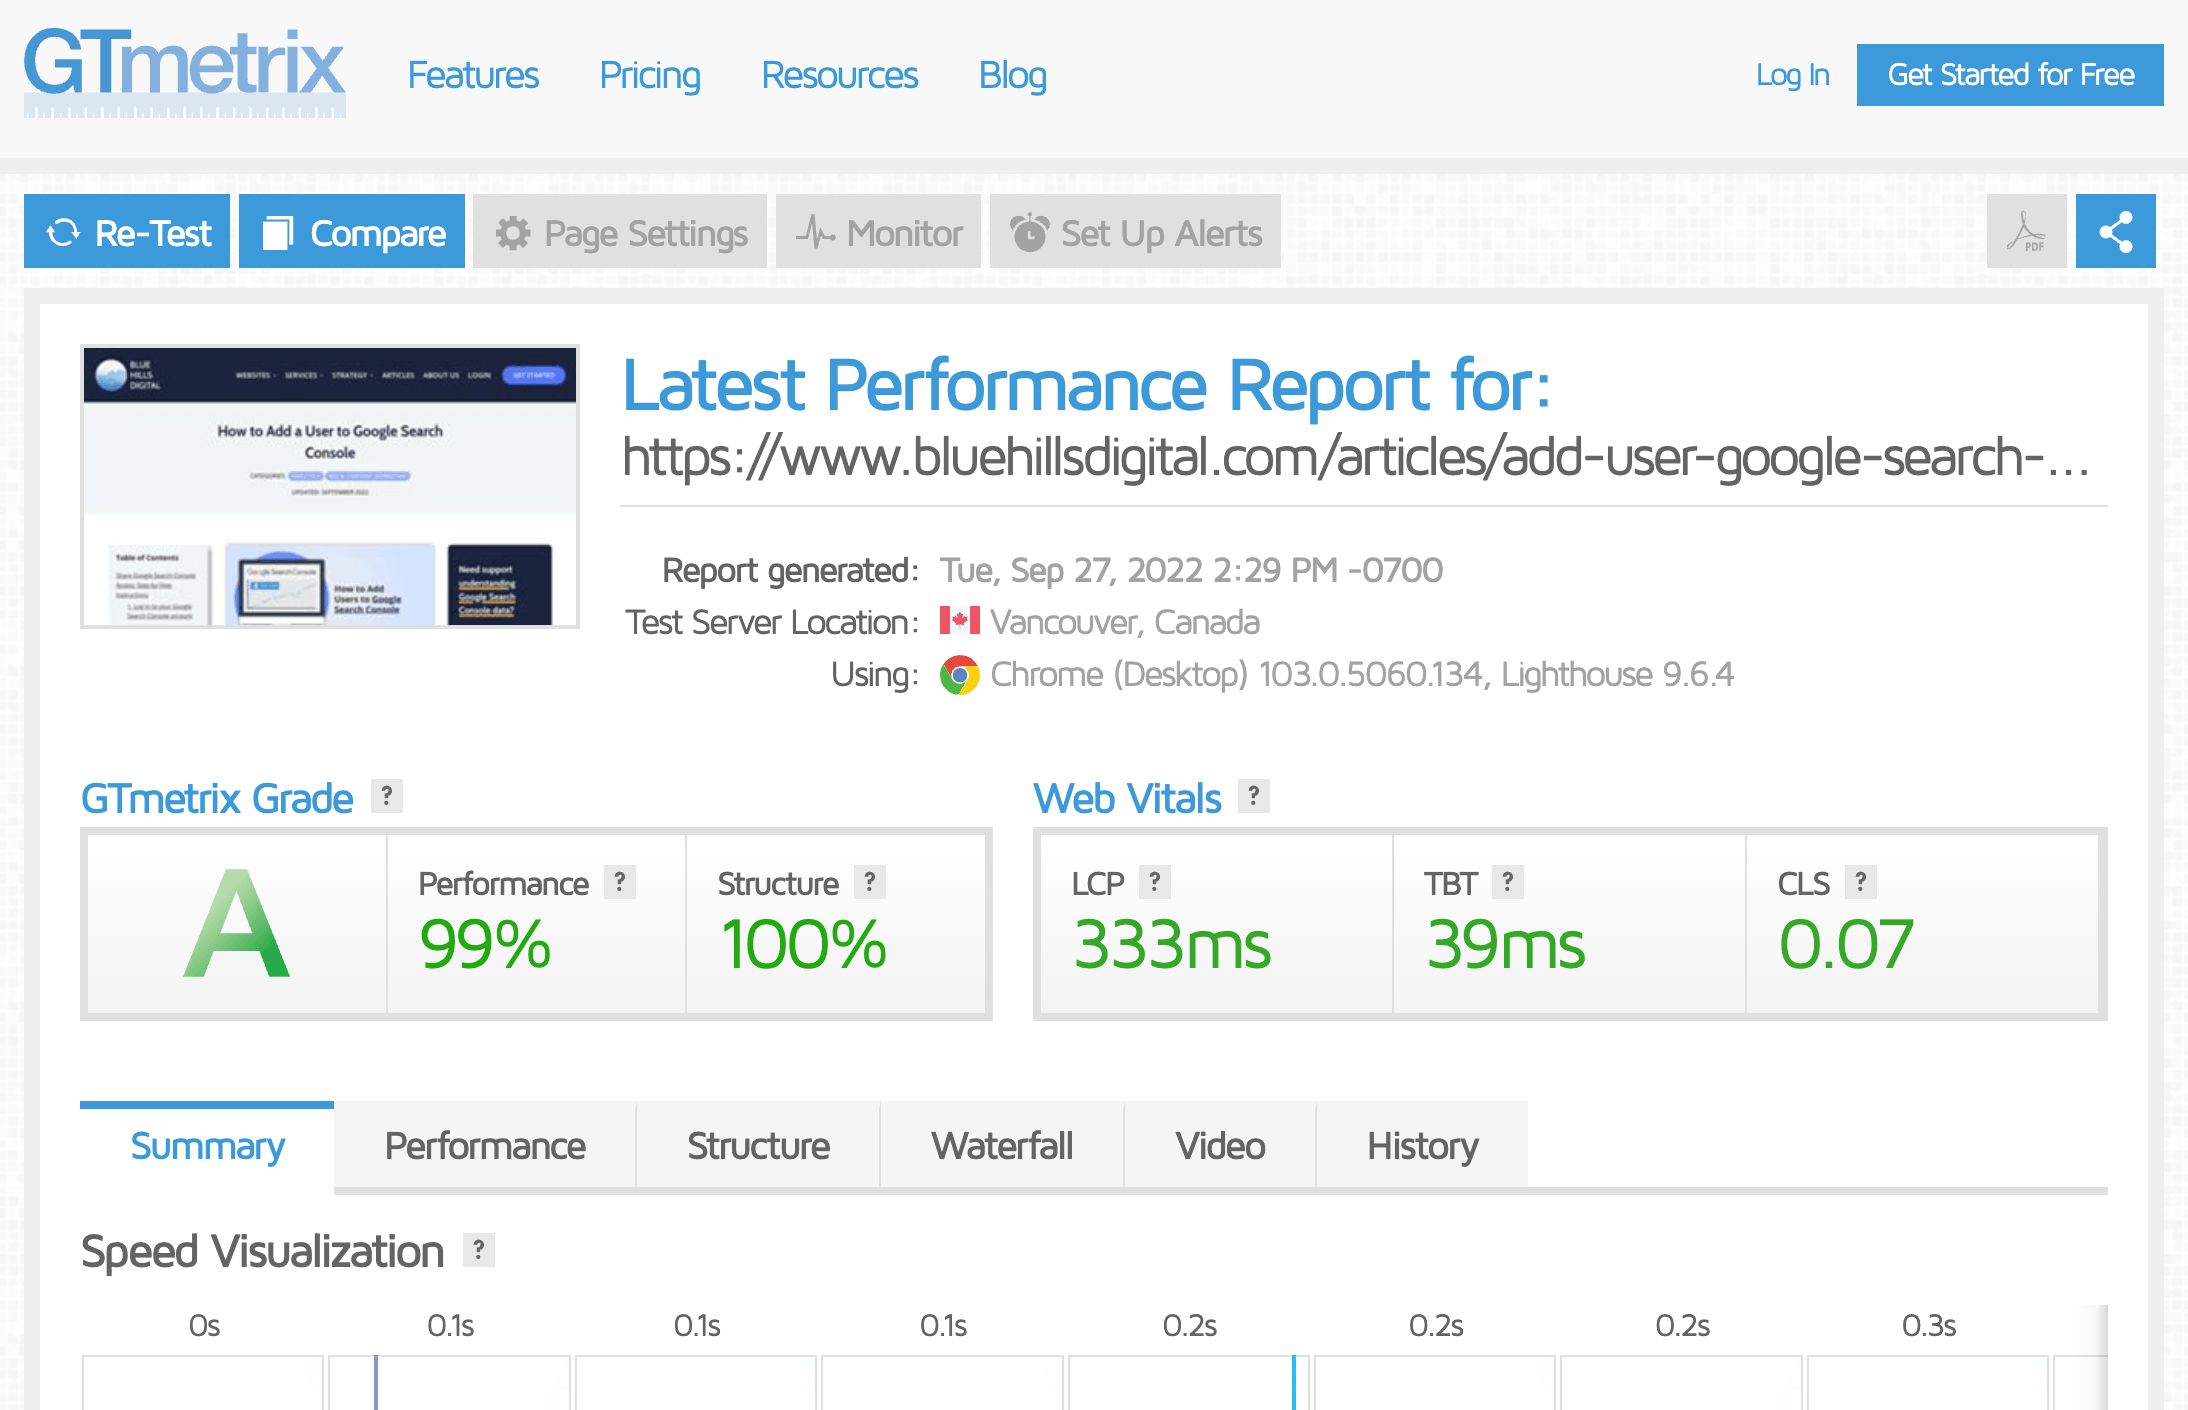
However the results and technical suggestions will point you in the right direction for opportunities to speed up your website.
Generally, opportunities to speed up your website will come from two places:
- Optimizing page load times (for example, by optimizing images, leveraging caching, using content delivery network)
- Moving to better hosting provider (web hosting is an area where you often get what you pay for)
Step 5: Fix indexing problems using Google Search Console
Now let’s take a closer look at what Google is indexing on your website and what indexing issues the crawlers are encountering.
To do this, we’ll use the free tool Google Search Console.
If you don’t already have Google Search Console set up for your website, follow our guide to setting up Google Search Console for your website.
To check for any indexing issues, open up the Index > Coverage report. Here, you’ll see a breakdown of the indexing status of all the URLs on your website that Google is aware of, along with details of any errors.
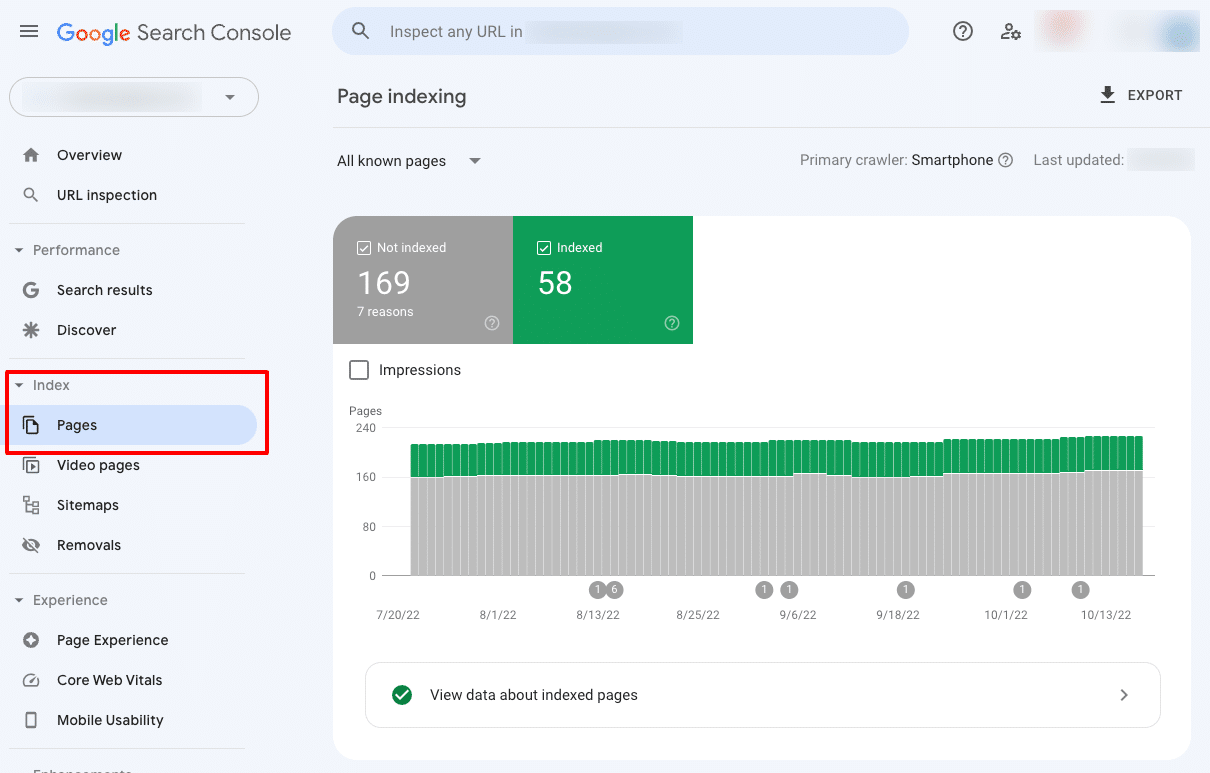
If you scroll down below this graph, you’ll see a list of the URLs that are not indexed, along with the reasons why Google has excluded these URLs from the index.
Some of these URLs may have been excluded from indexing deliberately, and that’s fine. However you may also see URLs in the Not Indexed section that are have been excluded because of an error. Once you fix these errors on your website, you can use Google Search Console to “Validate” your fix. This may take a few days to complete.
Step 6: Remove low-quality and unnecessary pages from Google’s index
This step is a favorite, because it makes the rest of the audit much easier!
It’s often a surprise to website owners just how many URLs Google has indexed on a website.
Using the same Google Search Console Page Indexing report from Step 5, click on the link below the bar chart labeled “View data about indexed pages.”
On the next page, you’ll see a list of the indexed URLs (capped at 1,000 URLs). The total number of indexed URLs is often much higher than the total number of truly valuable content pages or blog posts on your website.
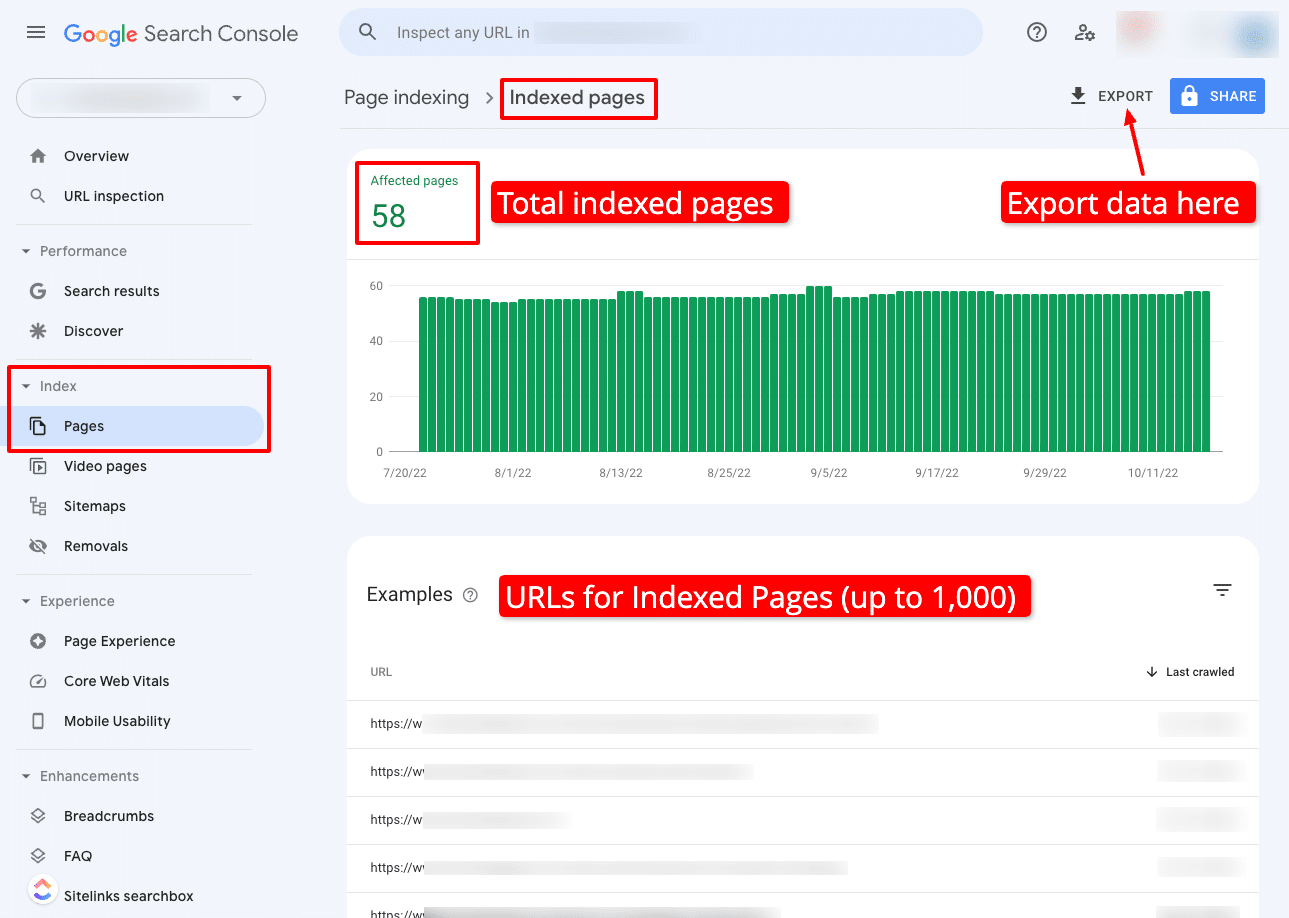
Google has made clear that including low-quality content in the group of pages indexed by Google certainly will not help your search rankings, and in some cases may harm your rankings. At minimum, more of Google’s “crawl budget” will be wasted indexing low-quality, low-value pages.
This doesn’t mean you should delete these pages from your website. But you should add a noindex tag so that they will be excluded from the group of pages indexed by search engines.
Potentially low quality pages that are often indexed by default might include:
- Taxonomy archive pages for categories or tags
- Paginated archive pages
- Pages that are not relevant to search engines, such as your Privacy Policy page, or your user login page
For more insight on the question of whether more content is better, check out this short discussion with Google’s Martin Splitt:
Step 7: Fix broken links and stop 404 errors
Broken links result in poor user experience, so it’s worth trying to resolve any broken links that are resulting in that “404 page not found” error message on your website.
Using the same Google Search Console Page Indexing report we used in Steps 5 and 6, click into the Not Indexed pages to view the various reasons why some URLs have been excluded. If you see “Not Found (404)” in the list of reasons, click into that report to see a list of URLs that are resulting in 404 error messages. (The same applies for the “Soft 404” report.)
The example website below includes several URLs with the “Not Found (404)” error that should be resolved:
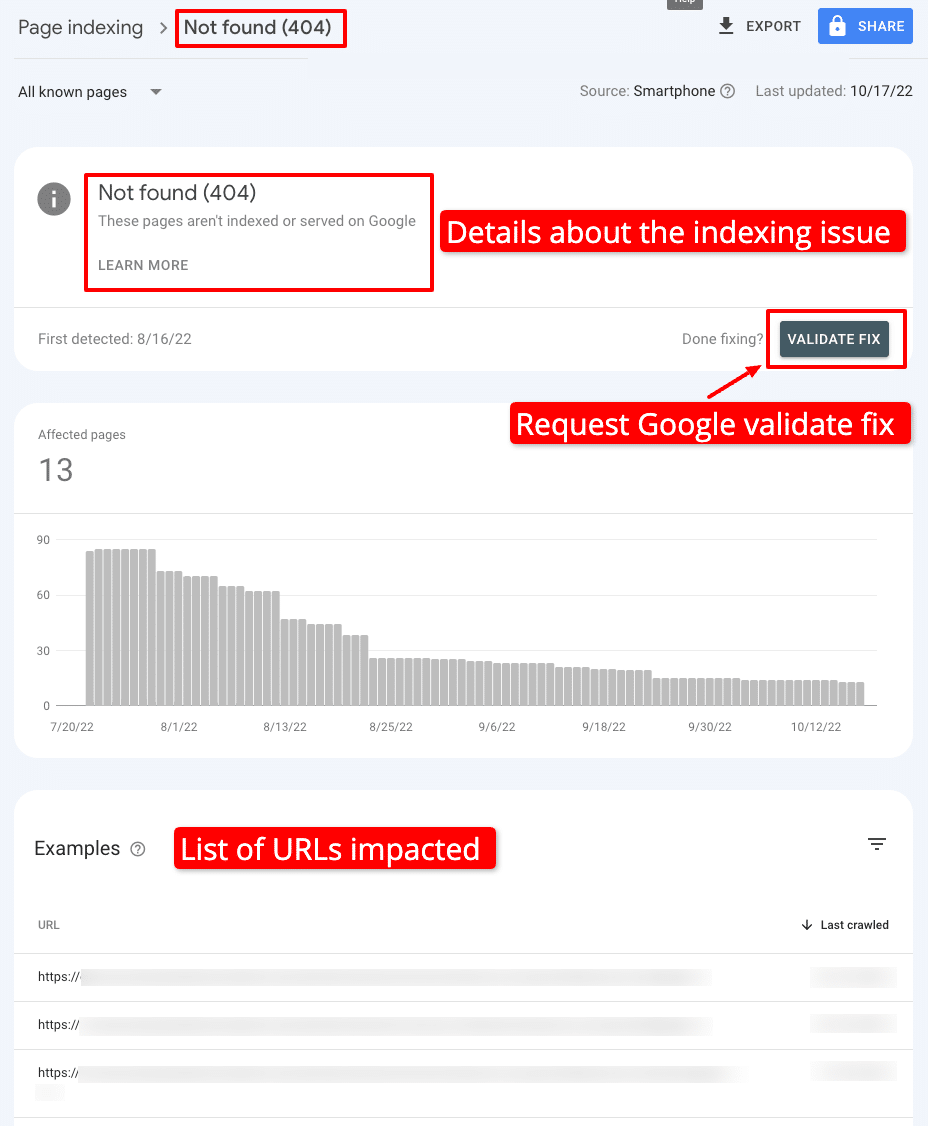
Once you have finished applying fixes to these issues on your website, use the “Validate Fix” button highlighted above to request that Google re-crawl these URLs and see if the errors are resolved.
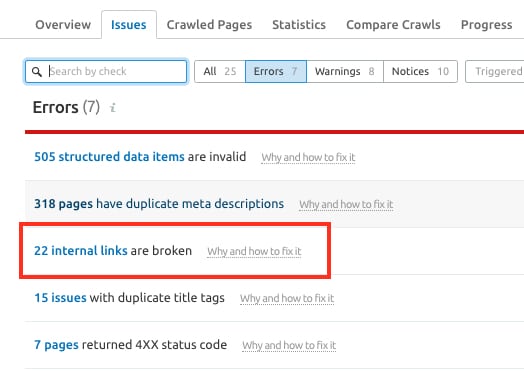
Next, we’ll need to use a different tool to check for broken internal and external links that your webpages may contain. Professional website audit tools like Semrush or SE Ranking include broken link checking in their site audit tool suites. (If you don’t have a paid account both of these tools include free trials.)
Here’s an example of a Semrush Site Audit report revealing 22 broken internal links:
Step 8: Analyze backlinks (and disavow toxic links if necessary)
Backlinks are links to pages on your website from other websites.
Backlinks are still a significant signal that contributes to search engine visibility, but it’s important to remember that not all backlinks are equally valuable.
The SEO benefit conferred on your website by a backlink depends on the domain authority (think of this as the quality, trustworthiness, and prominence) of the referring website.
Conversely, having too many backlinks pointing to your website from low-quality, spammy websites can negatively impact your website.
To analyze your backlink profile, you’ll need a tool like Semrush (that’s what we use). Other options include SE Ranking, Moz, Majestic, and Ahrefs.
The tool provided by Semrush may identify some backlinks as “potentially toxic” or “toxic.” If any backlinks to your website are identified as potentially toxic, you should follow Google’s guidance to consider whether the risk is enough to formally disavow those links.
Bear in mind that having a few spammy backlinks in your overall link profile is normal, and nothing to worry about. You should only take the step of disavowing backlinks if you have a large quantity of spammy, artificial, or low-quality links pointing to your site and those links have caused a manual action, flagged in the Manual Actions section of your Google Search Console property.
If your site does have a large quantity of low-quality, artificial backlinks it may be because someone purchased backlinks in the past. Which leads to this note: don’t pay for backlinks. Invest your money in quality content instead!
Step 9: Check your website against user accessibility guidelines
In this step, we’ll use a free tool provided by the WebAIM to check your website against accessibility standards.
Open the WAVE tool from WebAIM and enter a URL from your website. You may need to run the tool on several different pages from your website to make sure all your standard page layouts are set up correctly.
You’ll see a report that looks like this:
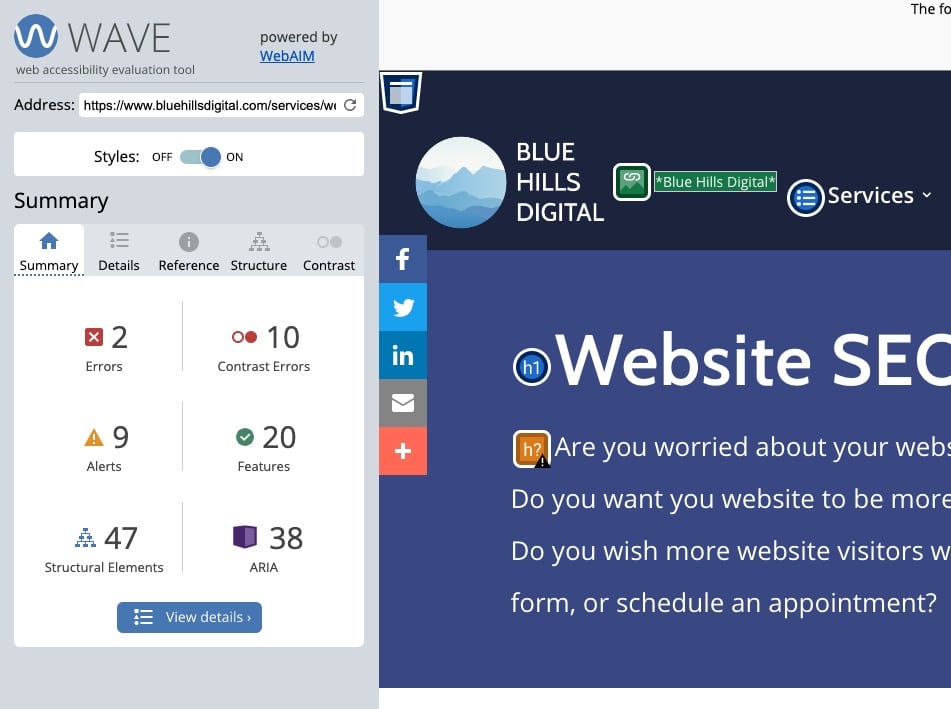
The panel on the left includes a summary of the errors, warnings and accessibility features the tool identified on the page. You can click into the details tab to view more information about which page elements triggered the different checks.
You also click the badges overlaid on the webpage itself to get more information about specific elements.
If you’re using WordPress, consider using the Accessibility Checker Pro plugin to get detailed recommendations for improving accessibility on your website.
Step 10: Improve on-page SEO for your most important content
Now we’re drilling down to the page level to look for SEO improvements.
For this step, pick a handful of the most important pages on your website to focus on. Here are some good places to start:
- Pages or blog posts that target keywords that are important to your business
- Pages that could boost your business if they attracted more traffic
- Pages that already have a strong search presence but could get even higher (look at pages that are on page 2 of the Google search results and could reach page 1)
First of all, make sure your pages are optimized for their target keyword. Use this resource to learn more about conducting keyword research. If nothing else, make sure your target keyword or keyphrase is included in the page title, and in the first paragraph of content.
Second, make sure your pages are well connected to other relevant pages on the internet. Website crawling and indexing takes place by following links, so ensuring your webpages have these connections is key. Make sure to include:
- Internal links to other relevant content on your own website
- External links to reliable sources of relevant information on other websites
Third, make sure your content is easy to skim-read:
- Use short sentences and short paragraphs.
- Use bulleted and numbered lists wherever possible.
- Structure the content using subheadings that follow a clear hierarchy.
- Include images, diagrams, graphics, and video where possible.
Step 11: Make sure your content gives users what they are looking for
Google wants to display the pages that will deliver the best user experience. For many search queries, this means answering the user’s question or providing relevant information about the topic they searched for.
Search engines (likely) pay attention to how much time a user spends on a page after clicking through from a search query. If users quickly return to the search and continue clicking on other results, that’s probably an indication that the user did not find what they were looking for on your page.
For all those important pages on your website that you identified in the previous step, consider what a searching user is likely to want when they enter your target keyword into Google. Make sure your page gives them what they are looking for!
Step 12: Organize your website navigation
Your website’s navigation structure is the easiest way to think about your overall site architecture: how pages are grouped together and organized into a hierarchy of importance.
Having a clean, simple website architecture is important for three reasons:
- It’s easier for users to understand what your website is about and find the content they are looking for.
- It’s easy for search engine crawlers to find all your content and index the website accurately.
- It communicates to Google (and your users) which pages are more or less important.
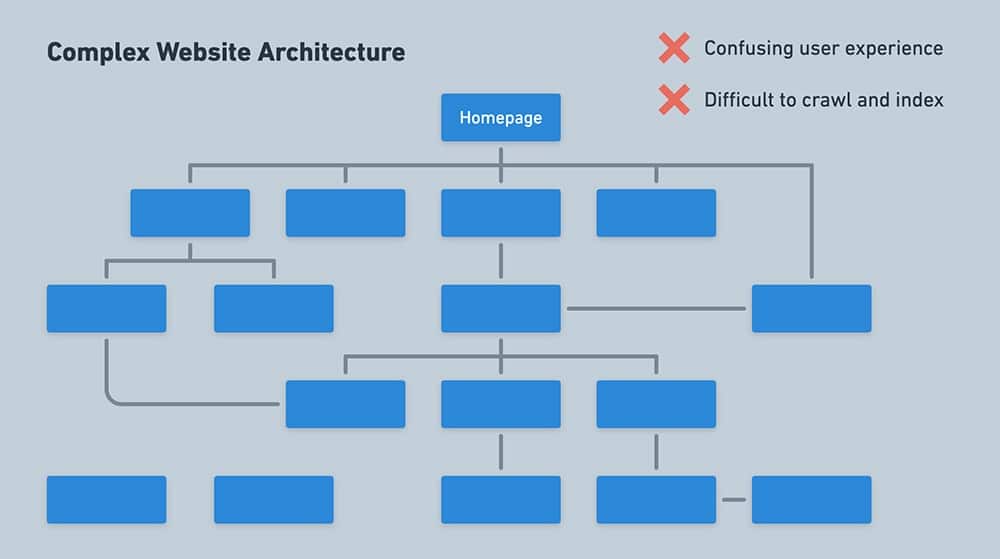
The first image below is an example of a messy, unclear site architecture. Notice a few things?
- Some pages are buried four or five levels deep below the homepage
- The distribution of pages between sections is uneven
- Some pages are only accessible by going “down” into a section and then “across”
- Some pages are “orphaned” – they don’t have a parent page and are not connected into the overall architecture.
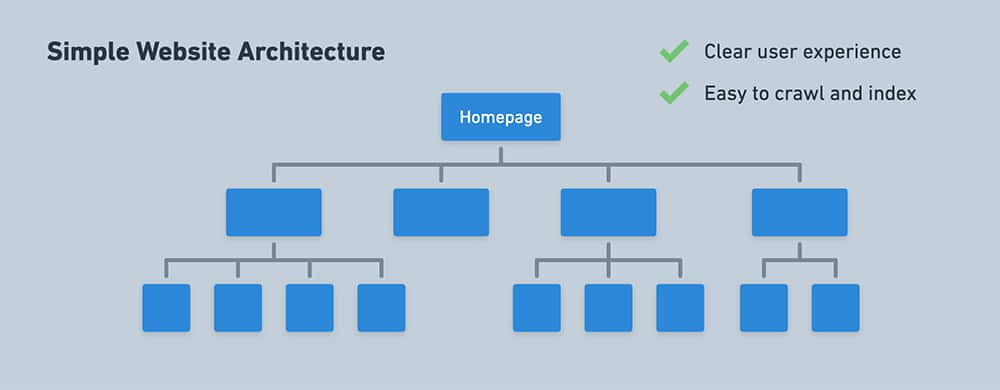
On the other hand, here’s an example of a clean, simple website architecture. These examples generally appear more “flat” when mapped out in a sitemap diagram like this.
- All pages are tied in to the overall architecture
- All pages can be reached from the homepage within 3 clicks
Step 13: Peek at your competitors’ websites and identify content gaps
Next up, use a tool like Semrush to spy on some of your competitors’ websites and see what organic keywords they are ranking for.
If you’re using Semrush, you can enter any domain into the Organic Research tool and get a list of their top organic keywords (as well as an estimate of how much organic traffic they receive).
Once you’ve checked a few of your competitors’ websites, you’ll start to identify some content gaps: keywords that your competitors are ranking for that are missing from your own rankings. Consider these keywords, or related terms, for new content development on your website.
Step 14: Set up recurring website health monitoring and alerts
Congratulations – you almost made it to the end. Step 14 and 15 are all about making sure you continue to stay on top of all of the website performance issues we’ve cover in this checklist.
If you invest in a professional SEO tool, you can set up a recurring website audit which will scan your website on a regular schedule and alert you to a wide range of the issues we’ve covered in this guide.
We use Semrush to run regular site audits, and happily recommend their suite of SEO tools.
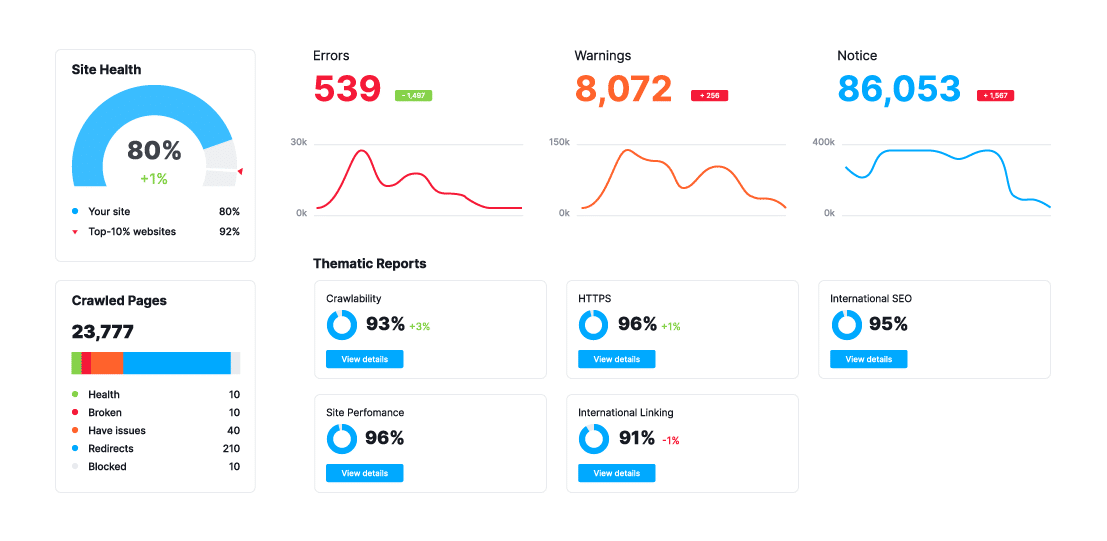
The Semrush Site Audit dashboard provides a weekly scan and email alert about changes in the numbers of errors, warnings and notices across over 100 different audit checks. Here’s an example of the Site Audit overview dashboard:
Step 15: Set up keyword position tracking and alerts
If you have invested the time in doing keyword research and optimizing your website content, you’re probably interested in tracking whether your positions in the Google Search Engine Results Pages (SERPs) is increasing or decreasing.
Consider using Semrush’s Position Tracking tool (or an equivalent keyword position tracker) to monitor the positions of your target keywords.
Explore our Website Audit Services
Conducting a full website audit takes time. And once you’ve gathered the information detailed in this guide it can be difficult to prioritize website improvements.
Our Website SEO Audit services are designed to solve this problem for busy website owners. For an affordable price, we’ll conduct a one-time SEO and website health audit and share the results with you on a Zoom video call with detailed recommendations on the top priority items to address.
Need professional support improving your website performance?
Let us help optimize your website and so you can meet your marketing and communication goals. Get started with a website health audit or consultation.
Table of Contents

