Squarespace SEO Checklist: 15 Tips to Increase Search Rankings
By: Ed Harris / Published: December 6, 2020 / Last updated: June 28, 2024
Updated for 2023. In this guide to SEO for Squarespace we provide a simple checklist that you can use to help your website achieve higher rankings in Google search results. Follow the steps in this guide and you should see improved performance in organic search results and increased traffic to your website.
Here’s what we’ll cover:
- The myth that Squarespace is bad for SEO
- Whether there is a Squarespace SEO plugin like Yoast for WordPress
- A quick overview of what SEO means for modern websites
- 12 tips for “On-Page SEO”: changes you can make to your Squarespace website to improve SEO
- 3 more tips for “off-page SEO”: actions to take beyond your website to improve SEO
Is Squarespace bad for SEO?
The short answer is no. Squarespace is a powerful, affordable website builder that offers a strong foundation for SEO. The following SEO features built in to every Squarespace website:
- Squarespace generates an automatic sitemap (which is also updated as content changes)
- A free SSL certificate is provided for every website, to make secure connections easy. Google has rewarded websites for adopting HTTPS since 2014.
- Squarespace generates clean HTML markup and URL structures that are easy for search engines to index.
- All Squarespace websites are mobile responsive which improves user experience (and which matters to Google too).
Disclosure: some of the links below are affiliate links, meaning that at no cost to you, we will earn a commission if you click through and make a purchase. Learn more about the products and services we recommend here.
Is there a Squarespace SEO plugin, like Yoast for WordPress?
Squarespace provides some “extensions”, but doesn’t feature an official plugin library (like WordPress), or “store” with approved apps you can add to your website (like Shopify).
However there are products marketed as Squarespace plugins created by third-party developers who are unaffiliated with Squarespace.
Yoast is a popular SEO plugin for WordPress that helps you optimize a post or page for a specific target keyword. You can add SEO plugin functionality to your Squarespace site using a paid Chrome extension called SEOSpace. The extension provides an overlay on any Squarespace page, post or product which provides a based check for technical SEO features. Even more helpful, if you enter a target keyword, the extension will help you improve your content.
Remember, SEO plugins like Yoast for WordPress or SEOSpace for Squarespace are only as good as the keywords you enter, and rely on you to make all the necessary edits to improve the content. More on this below.
On all platforms — WordPress, Squarespace, or any other website builder — SEO is really about two things: creating quality content and attention to detail. No plugin can do all the SEO work for you!
What is SEO?
Before we dive into our Squarespace SEO Checklist, let’s review what SEO means today. SEO stands for Search Engine Optimization, and it includes all the actions you can take as a website owner to help search engines like Google better crawl, index, and understand your web content and then show it to the right audience of people in search results.
This means that the most important factor in SEO is finding a match between a user’s “search intent” (what they’re looking for, or the question they’re trying to answer) and quality web content that provides what the user wants.
In this guide, we’ll touch on some tips for creating quality content but we’ll focus on actions you can take to improve the visibility of your content for search engines.
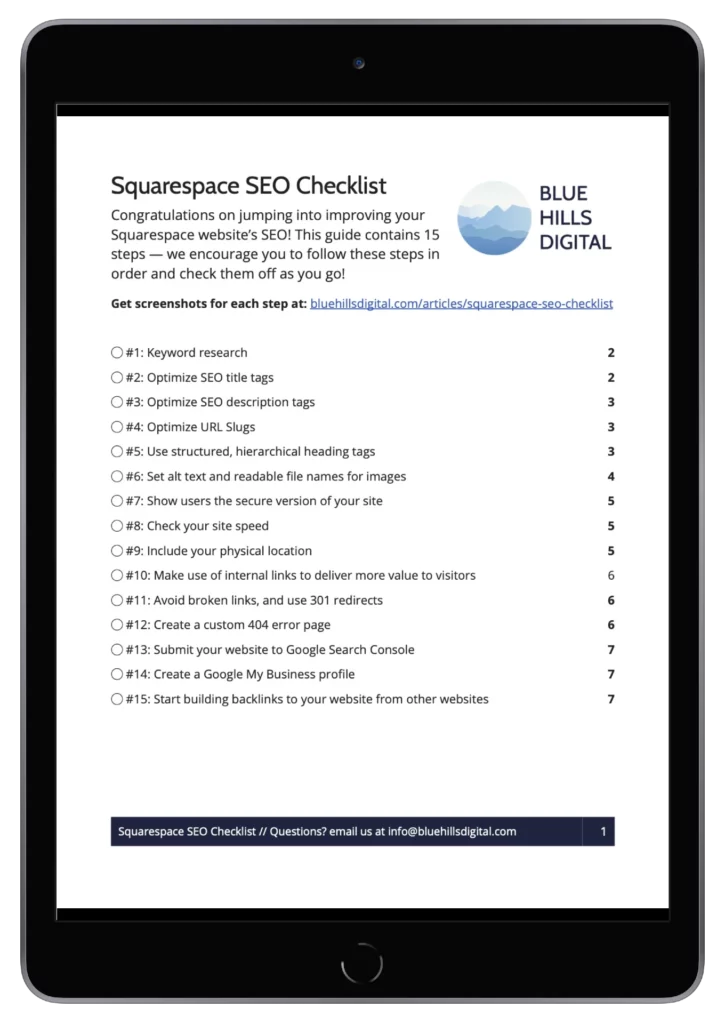
Get your FREE Squarespace SEO Worksheet
Receive a free printable worksheet to guide you through optimizing your Squarespace site for search engines.
"*" indicates required fields
Unsubscribe at any time. Privacy Policy and Terms of Use apply.
12 on-page SEO tips for Squarespace
1. Start with keyword research to help you create high-quality content
Conducting keyword research is a critically important step in SEO for your Squarespace website (or for any website). For every page on your website that will be indexed by search engines you should identify the primary or “focus” keyword (or keyphrase) you want to rank for.
While this might seem overwhelming if you already have a lot of content and haven’t done any keyword research, don’t worry. You can start with your highest priority pages, or the pages that have the most direct impact on your business goals.
Use a spreadsheet to make a list of every page on your website, with columns for:
- URL
- Focus keyword
- Page title
- Meta description
There are plenty of other columns we could include as well, but these will get you started and we’ll use them in the next three steps.
2. Optimize your title tags
Every page on your website has a title tag which sends a powerful signal to search engines (and users) about what the page contains. Make sure your title tag includes your focus keyword.
The process for editing the title tag in Squarespace is a little different depending on whether you’re editing the homepage, a regular page, a blog post, or a product.
Editing the homepage title
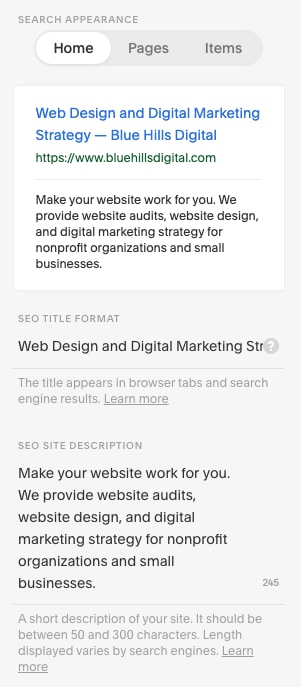
To edit the title tag for the Squarespace page that is designated as the homepage for your website, go to Marketing > SEO, and select the “Home” tab.
Enter your preferred title in the “SEO Title Format” field, and you’ll see the search preview populate above. Keep an eye on the total number of characters!
Editing page titles
To add or adjust the SEO page title for other pages on your Squarespace website, go to the “Pages” section, and click the gear or settings icon for the page you want to edit. In the popup window, select “SEO”, and enter your page title in the “SEO Title” field, and click save.
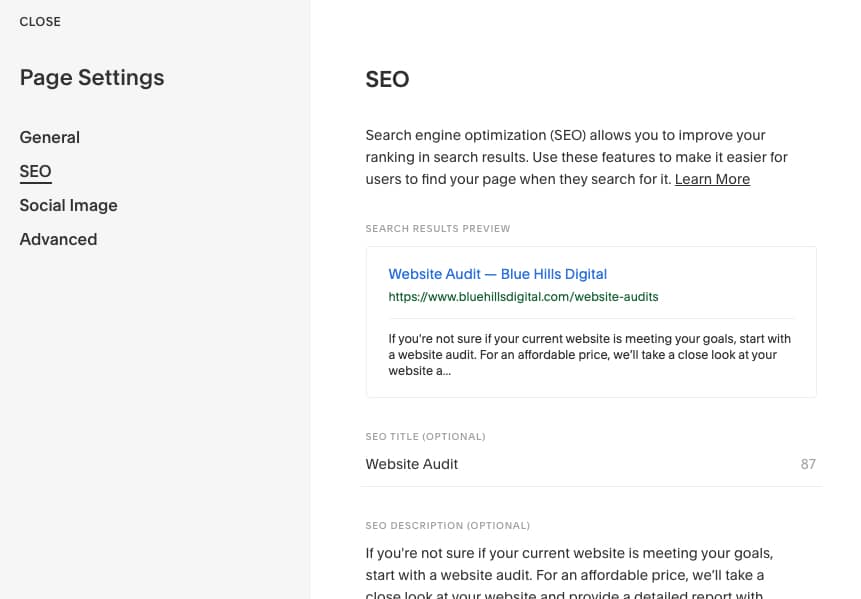
Note: the instructions and screenshots in the following sections apply to Squarespace 7.1. If you are using Squarespace 7.0, the SEO settings are located in the relevant settings panels.
Editing blog post titles
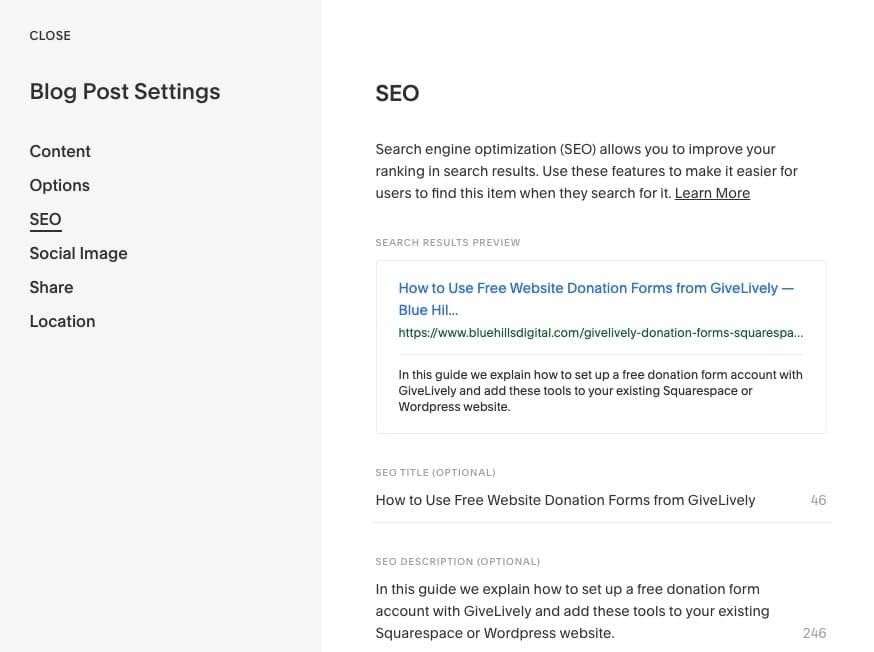
Optimizing blog post titles is just as important, particularly because search engines like regularly updated content. To add or edit a blog post title, open the relevant collection from the “Pages” section of the main Squarespace menu.
Hover over the relevant blog post, click the three-dot icon, and click on “Settings.” Choose the “SEO” tab, and you’ll see the option to add or edit the “SEO Title” field.
Editing product titles
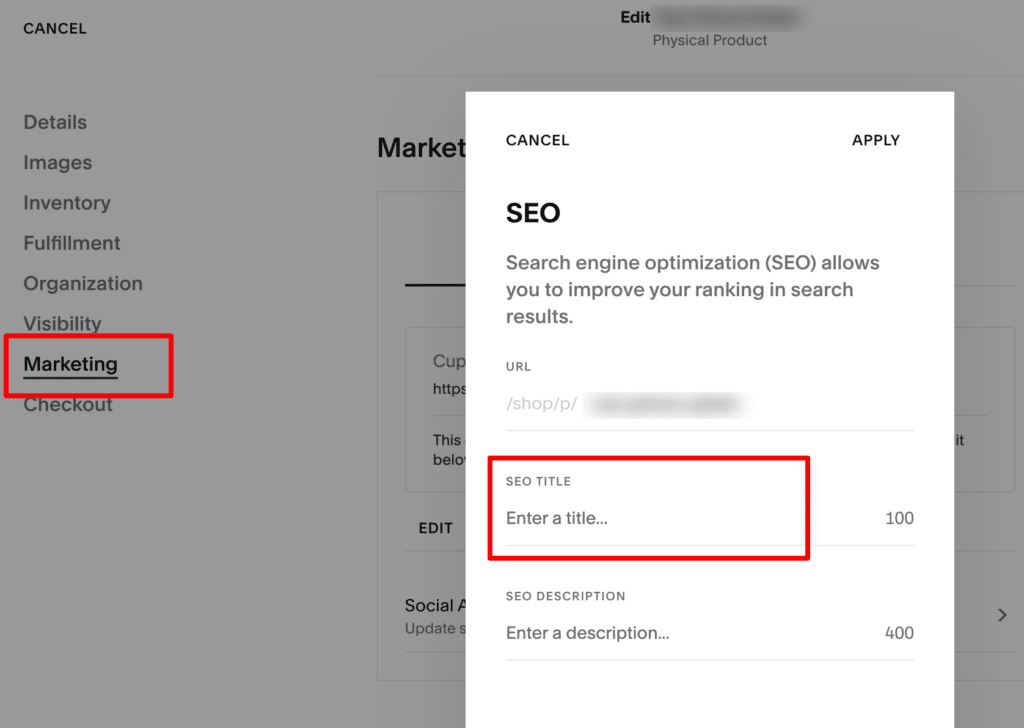
To set the SEO title for a Squarespace product listing, start by editing the product and selecting Marketing from the settings menu on the left. Click Edit in the SEO and URL section. This opens a window where you can edit the URL slug, SEO title, and SEO description.
3. Optimize your meta description tags
Just the same as all your pages need a strong title tag, it’s important to make sure all pages have a strong meta description tag as well. The meta description is the short chunk of text that search engines may display below the page title and URL on the search engine results page, although note that often Google selects different text to display here.

It’s worth taking the time to write custom meta descriptions because they are a significant factor in determining whether a user decides to click through to your website from a search results page. Again, make sure to include your focus keyword in the meta description, and give the user a sense of what value they will get from the page if they click through.
Squarespace uses the same interface to add meta descriptions as adding SEO titles, so check the screenshots from step 2 above to find where to add those SEO descriptions.
4. Optimize URLs
Squarespace gives you the opportunity to create clean, short, easy-to-read URLs for each page, blog post and product.
The URL is another place where you should make sure to include your focus keyword. Not only does this make it easier for a search engine to determine what the page is about, but it also presents another chance to get your focus keyword in front of the user on the search engine results page.
Here are some tips to remember:
- Keep URLs short.
- Separate words with hyphens, not with spaces or underscores.
- The URL doesn’t have to match the page title exactly.
To create a custom, optimized URL for a Squarespace page, click the gear icon to open the settings menu, and in the “General” section, enter the URL in the field labeled “URL slug”. Note that you only need to enter the last part of the URL structure.
To create a custom URL for a Squarespace blog post, open the post settings and use the Options tab to edit the Post URL.
To edit a product URL slug, use the same Marketing settings window as highlighted in step 2 for the SEO title.
5. Use heading tags to structure content
Now that we’ve tackled the titles, meta descriptions and URLs, we can turn our attention to the content of the pages on your website. Within each page, following the hierarchy of heading levels helps search engines (and visitors) make sense of your content.
Every page should have one (and only one) Heading 1 tag which should include your focus keyword (likely the title at the top of the page). After that, use Heading 2 headings to divide up content by sections, and use Heading 3 headings within sections if necessary.
6. Set alt text and readable file names for images
As you’re adding images to your Squarespace website, get into the habit of setting “alt text” to each image when upload it because it’s a time consuming detail to go back and edit later. However, there are three good reasons to take the time to add alt text to images:
- Alt text allows screen readers to interpret and “read” a description of each image.
- Similarly, it allows search engine crawlers to understand what value an image adds to a page.
- If the image fails to load, the alt text displays instead.
The mechanism for setting alt text varies between contexts in Squarespace – for example, between image blocks and images contained in galleries, and also between Squarespace 7.1 and 7.0.
Review the image alt text support article from Squarespace for complete and up-to-date steps for adding alt text.
Another pro-tip regarding images: search engines also gather the file names of images displayed on your site, so this presents another opportunity to remind search engines that images are a deliberate and relevant part of the page content.
The easiest way to set image file names is to choose human readable file names before uploading them to Squarespace. For example, use the filename grand-canyon.jpg instead of IMG5624.jpg for blog post about National Parks.
Phew. We’ve made good progress optimizing each individual page on your Squarespace website, but now we need to turn our attention to the Squarespace site as a whole for tips 7 through 12.
7. Show users the secure version of your site using SSL, HTTPS and HSTS
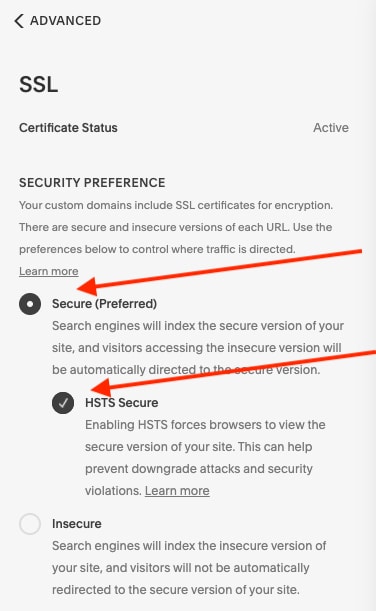
Squarespace makes it easy to follow best practices and force users to load your website using the secure HTTPS protocol. Simply go to Settings > Developer Tools > SSL and choose the Secure option.
While you’re there, check the HSTS Secure box as well – this encrypts the connection and prevents improper access or impersonation of your website.
Learn more about these options from the Squarespace Support SSL Certificates guide.
8. Check your site speed
Search engines and users prefer fast-loading webpages over slow ones, and page load speed factors into how Google’s core ranking systems assess the overall page experience.
Part of the benefit of Squarespace, as a hosted platform that saves you having to make decisions about web hosting and servers, is that much of the server-side optimization of page load time is taken care of for you.
However, there are still some important steps to take to ensure the content you create on your Squarespace site doesn’t result in slower page speed for your users:
- Keep your images appropriately sized (no wider than 2000 pixels), and reduce file size as much as possible. Squarespace recommends using images that are less than 500 KB, although many image files can be reduced to 250 KB or less.
- Try to use as few external scripts or custom code snippets on your website as possible.
- Limit the number of web fonts in use on your website.
To check your Squarespace website speed, plug some of your page URLs into Google’s PageSpeed Insights tool, and review the recommendations.
9. Include your physical location
Squarespace websites also help with local SEO if your website is for a business or organization with a physical location.
- Use the options under Settings > Business Information to list contact information and a physical address.
- Make sure to include helpful information like a location map and directions on page titled “Contact Us”, “How to Find Us”, or “Location”.
- Consider adding your physical address in the website footer, so that it is easily accessible from every page.
10. Make use of internal links to deliver more value to visitors
Make an effort to showcase and link to other relevant content on your site from each page. Using internal links (or “crosslinks”) within your website has two benefits:
- When a search engine indexes your website, it will help it understand what pages are related to one another
- By surfacing related content, you encourage visitors to navigate around your website after reading the first page they visited, increasing the time they spend on your website.
11. Avoid broken links, and use 301 redirects
Avoiding broken links is an important part of SEO for your Squarespace website. This means that if you ever decide to change the URL of a page, you need to create a “301 redirect” that connects the previous URL to the new one. This has three benefits:
- It makes sure any visitors clicking on links pointing to the old version of the URL are redirected to the right place.
- It ensures search engines know where that piece of content is now located.
- It preserves any SEO “value” or “link equity” that has accrued to the previous version of the URL, as a result of search engines learning that the content is valuable, and passes that value along to the updated URL.
To manage 301 redirects in Squarespace, go to Settings > Developer Tools > URL Mappings.
To add a new 301 redirect, use the format: /old-url-slug -> /new-url-slug 301
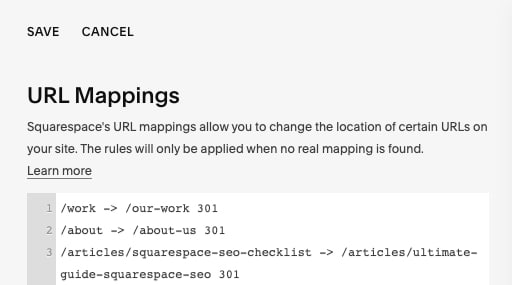
Enter each redirect rule on a new line, and then click save to make the changes effective.
Related resource: check out our guide for managing URL redirects and maintaining SEO rankings when migrating a website to Squarespace.
12. Manage broken links and create a custom 404 error page
Later in this guide we’ll share how to use some external tools to scan your website for broken links that need to be fixed.
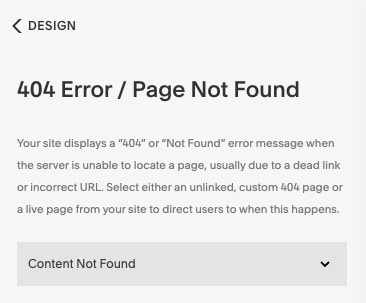
In the meantime, Squarespace allows you to customize the “404 error page” that is shown to users that follow a link that Squarespace cannot find.
This allows you to avoid showing users a generic and confusing error message and instead provide some links to the most popular content on your site, or provide a direct link to contact you as the website owner to find what they’re looking for.
Creating a customized 404 error page involves creating a brand new, regular page from the Pages section of the Squarespace dashboard that includes the content you want to display. Once that page is saved, go to Design > 404 Page, and select the relevant page from the dropdown menu and click Save.
3 off-page SEO tips for your Squarespace website
Now let’s step away from the details of your website, and review three simple actions you can take elsewhere on the internet to boost your SEO.
13. Submit your website to Google Search Console
SEO is all about making sure search engines can index and discover all the valuable content on your website, and both Google and Bing have tools for website owners to submit information about their websites and monitor their performance.
Google is the market leader in search, so get your website set up in Google Search Console first. While Squarespace does allow you to connect to Google Search Console through the Analytics section of your dashboard, we recommend getting familiar with the Google Search Console directly, since you’ll want to take advantage of some of the powerful tools and reporting it makes available.
Here are the steps to sign up:
- Sign up for Google Search Console here (it’s free)
- Once you have signed up, follow the prompts to add a new property, and choose the “domain property” option.
- You’ll have to verify that you own the domain for your website. There are several different ways to do this that are described in detail in Google’s documentation. We also have a complete guide to getting set up with Google Search Console here.
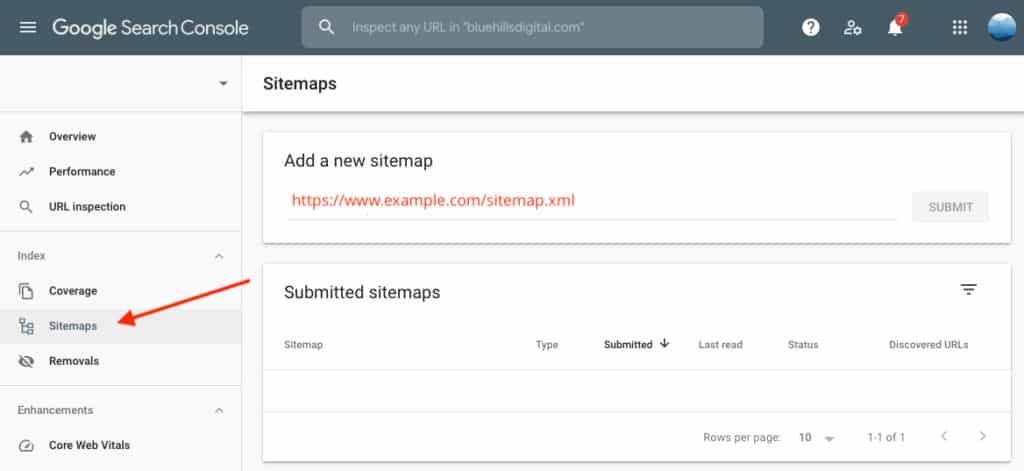
- Submit your sitemap to Google Search Console. Squarespace generates an updated sitemap automatically, and you can find this by adding /sitemap.xml to the end of your website’s root domain. Enter this URL into the “Sitemaps” section of the Google Search Console dashboard as illustrated below:
For additional guidance around setting up your Squarespace website with Google Search Console, check out these guides that contain additional detail:
- How to Connect Squarespace to Google Search Console
- Submit Your Squarespace Sitemap To Google Search Console
It will take a day or two for Google Search Console to index your site. After that, the dashboard will start to populate with useful data about your website’s performance. Here are a couple of things to watch out for:
- Check the Index > Coverage dashboard for errors. This is the easiest way to find broken links that point to a 404 error page on your website. Make sure to check the Coverage report regularly to identify any errors among the URLs that Google is indexing for your website.
- Troubleshoot performance issues with specific pages, using the “URL Inspection” tool. By submitting a specific URL here, you can request that Google re-index a page. This is helpful if you have just fixed errors on a page, and want Google to re-index the updated version of a URL.
- Check for mobile usability issues in the Enhancements > Mobile Usability dashboard. This tool will flag any issues that would make your website difficult to use on mobile devices, such as text that is rendered too small, or interactive elements like buttons that are too small or too close together.
Once you have your website set up with Google Search Console, it is easy to import those settings directly into Bing Webmaster Tools. Sign up for an account here, and follow the prompts to import your settings from your existing Google Search Console account.
14. Create a Google My Business profile
This step is particularly important if you want your Squarespace website to show up in local search results. Head to Google My Business to get started, either by creating a new business listing or claiming ownership of your listing if one already exists.
When you sign up, you’ll share basic information about your business (or organization) with Google including your mailing address. Then Google will contact you to verify your business ownership.
Once this process is complete and you have filled out enough detail on your Google Business profile, your listing will be eligible to appear in the map section of local search results.
15. Start building backlinks to your website from other websites
You made it to the final step! The number of inbound links (or “backlinks”) pointing to content on your website from other websites remains one of the top ranking signals that search engines use to determine rankings.
We recommend avoiding the scammy services out there that allow you to pay for backlinks. These links are likely to come from domains with low authority (making the backlinks less valuable), and are not likely to send high-quality traffic to your website.
Instead, focus on the following three steps:
- Create quality content that answers your audience’s questions.
- Find out what other blogs, websites, podcasts, or media outlets your audience visits for information about your topic.
- Find genuine ways to build authentic relationships with the people that manage those sites, and explore opportunities for guest blogging, being a guest on a podcast, or being a resource as they create content that appeals to your shared audience.
For some creative tips on outreach for link building, check out this blog post from SEO and audience intelligence expert Rand Fishkin.
Summary: You’re on your way to an SEO-friendly Squarespace website
🎉 Congratulations — you made it through our 15-step Squarespace SEO checklist!
If you follow the tips in this guide, you’ll start to see steady improvements in your search engine rankings, and you’ll build some good habits for creating SEO-friendly content for your Squarespace website.
Your website’s visibility in organic search results should increase, and if you’ve found a good match between the value you offer and what your audience is looking for, traffic to your website will increase too.
Note: Neither Blue Hills Digital nor the author have any professional affiliation with Squarespace — we just appreciate the platform and enjoy helping unlock its powers for other website owners.

